In this post, we will look at a typical deployment scenario where you want your website to be SSL encrypted, but you don’t want to be burdened with installing the certificate on every server on your farm. SSL Termination on the NetScaler will take care of this for you, giving you the flexibility to worry only about one certificate. We will use the same diagram from the previous post (Basic NetScaler Load-balancing Configuration).
You have been tasked with the following;
- Create a VIP listening on port 443 using 192.168.99.49 with the following parameters;
- Services 192.168.99.140, 192.168.99.141, and 192.168.99.142 should be listening on port 80
- Monitor the services with a TCP check to port 80
- Persistence should be off of the source IP address
- The load-balancing algorithm should be “leastrequest”.
- Create a self-signed certificate with the following parameters;
- Certificate File Name = sslterm-cert.cert
- FQDN = sslterm.routedinterface.com
- Bind the new certificate to the VIP
This demo will be split up into using the CLI and the NetScaler GUI. Creating the key, CSR, and the cert is easier in the GUI than in the CLI. Once that is done, we will move on to the CLI and configure the rest.
Configuration
Graphical Configuration
Self Signed Certificate Generation:
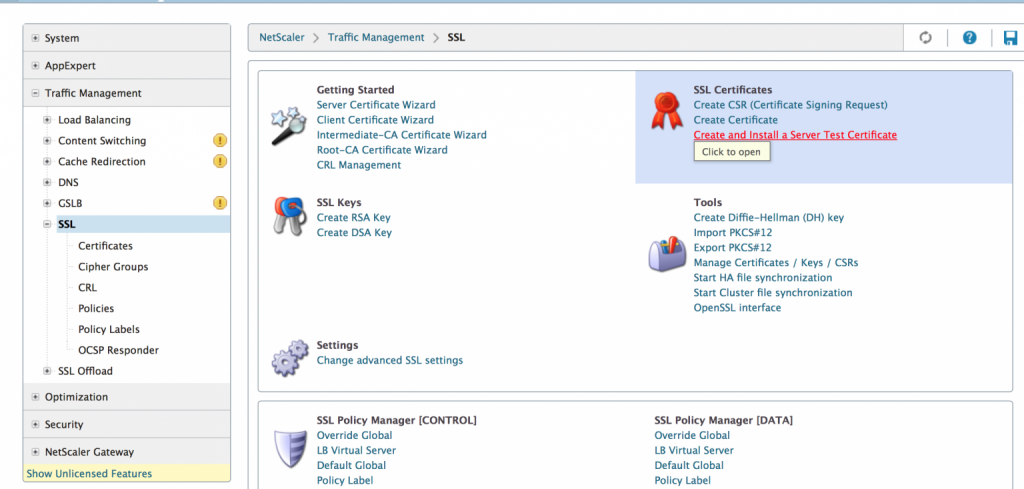
1. Go to Traffic Management → SSL and click on Create and Install a Server Test Certificate

2. Give the certificate file name a name and specify the FQDN of the site

CLI Configuration
Virtual_NS> add lb monitor TCP-80 TCP -destPort 80
Virtual_NS> add server RED-SERVER 192.168.99.140
Virtual_NS> add server BLUE-SERVER 192.168.99.141
Virtual_NS> add server PURPLE-SERVER 192.168.99.142
Virtual_NS> add service RED-SERVICE RED-SERVER HTTP 80
Virtual_NS> add service BLUE-SERVICE BLUE-SERVER HTTP 80
Virtual_NS> add service PURPLE-SERVICE PURPLE-SERVER HTTP 80
Virtual_NS> bind service RED-SERVICE -monitorName TCP-80
Virtual_NS> bind service BLUE-SERVICE -monitorName TCP-80
Virtual_NS> bind service PURPLE-SERVICE -monitorName TCP-80
Virtual_NS> add lb vserver SSLTERM SSL 192.168.99.49 443 -persistenceType SOURCEIP -persistmask 255.255.255.255 -lbMethod LEASTREQUEST
Looking at the vserver status, we see that it is down because we did not bind the certificate to the vserver. You will see this in the show lb vserver (name) command. I only used regular expressions to show us what we needed to see.
Virtual_NS> show lb vserver SSLTERM | grep "State:.D.*\[C"
State: DOWN[Certkey not bound]
Now we bind the certificate to the vserver
Virtual_NS> bind ssl vserver SSLTERM -certkeyName sslterm-cert.cert
Most of the show commands from the last post will work here, and there are a few more that we can use to verify everything is functional
Show ssl vserver (name): this will show you advanced SSL configuration parameters for the serverShow persistentSessions (name): this will show you all the persistent sessions for the vserver and the timers for which they will expire (the default is 2 minutes, which can be changed with this command (if the vserver is already created)set lb vserver SSLTERM -timeout 3
Show ssl stats: will give you an overview of all SSL traffic going through the NetScaler
A few things to keep in mind. When working with persistence, setting the mask to a /32 is best practice. If you do not, for example, make the persistence mask a /24, and someone from 12.56.224.64 connects, it will treat everyone on the 12.56.224.0 network as the same person and stick them to the server that .64 is on.
The following post on the horizon uses the built-in functionality of the NetScaler to decide what vserver should receive traffic intelligently. An example would be if you have a mobile site and don’t want a separate vserver. The NetScaler can look at the HTTP header and see that the request is coming from a mobile device and redirect you to the mobile farm, while non-mobile sites get redirected to the regular site.