Fellow Cisco people, I am back! After a long hiatus, I have decided to stop paying my hosting provider tons of money to keep a blog with a few posts.
I never stopped to think that SNMP was a topic people would have an issue with. SNMP versions 1 and 2c are easy to configure; you don’t need to go crazy with the configuration. What is needed to get it up and running? A read-only community string, maybe a read/write string? An SNMP location and contact or specific traps you are looking for? Then version 3 comes around, and while it adds some complexity for a newcomer, it is not any different than configuring a username on a Cisco router and tying a privilege level to that user. So, after someone I know studying for their CCNA asked me a question about SNMP v3, I decided to take a deep dive into all three versions of SNMP, complete with configuration examples!
***Disclaimer: Your SNMP implementation may vary from what I am showing/demonstrating here. This is not intended to be a complete SNMP configuration post because I would be here for hours explaining each detail, and frankly, I don’t want to bore anyone***
Now that my disclaimer is out of the way, let us get some explaining done!
So SNMP, or Simple Network Monitoring Protocol, is a way to probe and monitor your network. There are key names for devices in SNMP.
- SNMP Manager: This is the collection point that an SNMP device/agent points to send SNMP informs or traps to
- SNMP Agent: This is the device you configure SNMP on
- MIB: Management Information Base. This is how SNMP OIDs are managed in a tree-like structure.
SNMP Traps:
In my opinion, this is probably the most used of the SNMP messages. The SNMP agent will send a trap to the manager when there is a condition on the network. These are unsolicited messages sent by the agent. Traps are unreliable messages sent on UDP/162
SNMP Informs:
An SNMP inform is a message (same conditions met with SNMP Traps) sent by the SNMP agent and acknowledged by the SNMP manager. If the SNMP manager does not send an ACK to the SNMP agent, the agent will keep forwarding the unacknowledged messages until it receives an ACK. SNMP informs are sent on UDP/162
I thought SNMP ran on UDP/161; what is it with this new port? UDP/161 is what the SNMP manager will send to the SNMP agent when asking for a specific variable. For instance, when you do a SNMPWALK or when the SNMP manager polls the SNMP agent at a set interval, this is done over UDP/161, whereas if the SNMP agent is sending a trap or informs to the SNMP manager, this is done over UDP/162
SNMP v1 and SNMPv2c
Both support only community strings when polling/pulling information from an SNMP agent. The main difference is that SNMP v2c supports bulk retrieval and more detailed error reporting than SNMPv1. Their configuration is identical, and I will show SNMPv2c, the default SNMP version on most modern Cisco IOS images. So for our configuration example, we will create a read-only string of Read-Only; we will set a location of Atlanta, GA, and an SNMP contact of RoutedInterface NOC x4567.
Lab_CSR(config)#snmp-server community Read-Only ro
Lab_CSR(config)#snmp-server location Atlanta, GA
Lab_CSR(config)#snmp-server contact RoutedInterface NOC x4567
A few quick show commands to validate that all is good.
Lab_CSR#show snmp contact
RoutedInterface NOC x4567
Lab_CSR#show snmp location
Atlanta, GA
Lab_CSR#show snmp community | beg Read-Only
Community name: Read-Only
Community Index: Read-Only
Community SecurityName: Read-Only
storage-type: nonvolatile        active
Now, we are going to test our setup with SNMPWALK. We are going to poll the device to look for the sysName.0 MIB string
Mike@Mikes-MBP:~$ snmpwalk -v2c -c Read-Only -m SNMPv2-MIB 192.168.1.250 sysName.0
SNMPv2-MIB::sysName.0 = STRING: Lab_CSR.routedinterface.local
Perfect, that’s exactly what we were looking for.
SNMP v3
This is where configuration gets more involved. SNMP v3 supports authentication and encryption, aka privacy, so you can authenticate your SNMP users and encrypt the payload between the SNMP agent and the SNMP manager. There are different ways we can configure SNMPv3.
- NoAuth: No Authentication or Privacy
- Auth: Authentication, no privacy
- Priv: Authentication and privacy
Depending on the platform, authentication can be in the form of MD5 or SHA, while privacy can be DES, 3DES, or AES; if using AES, you can use 128, 192, or 256-bit algorithms.
This is going to be a basic group-to-user configuration. You can also tie different views to the groups so that one group can only see a specific group of MIBs and not all the MIBs the device supports.
I am going to create the following groups.
- NA – will tie the NoAuth security level to this group
- A – will tie the Auth security level to this group
- P – will tie Priv security level to this group
The following users will be tied to the following groups
- Nancy to group NA
- Al to group A
- Peter to group P
Configuration:
Define groups
Lab_CSR(config)#snmp-server group NA v3 noauth
Lab_CSR(config)#snmp-server group A v3 auth
Lab_CSR(config)#snmp-server group P v3 priv
Create users and tie them to groups
Lab_CSR(config)#snmp-server user Nancy NA v3
Lab_CSR(config)#snmp-server user Al A v3 auth sha Auth-Password
Lab_CSR(config)#snmp-server user Peter P v3 auth sha P@55w0rd! priv aes 128 Pr1v@cy!
Perfect! Let’s look at the running configuration for SNMP.
Lab_CSR#show run partition snmp
Building configuration...
Current configuration: 176 bytes
!
Configuration of Partition - snmp
!
snmp-server user Nancy NA v3
snmp-server group A v3 auth
snmp-server group P v3 priv
snmp-server group NA v3 noauth
!
end
Wait, why is only the Nancy user showing up and not any other users? When you configure a user for SNMPv3, it will store the user in a non-volatile RAM. To see the SNMP v3 users and the groups they are tied to, you can use the following command.
Lab_CSR#show snmp user
User name: Al
Engine ID: 800000090300000C29BB1612
storage-type: nonvolatile        active
Authentication Protocol: SHA
Privacy Protocol: None
Group-name: A
User name: Nancy
Engine ID: 800000090300000C29BB1612
storage-type: nonvolatile        active
Authentication Protocol: None
Privacy Protocol: None
Group-name: NA
User name: Peter
Engine ID: 800000090300000C29BB1612
storage-type: nonvolatile        active
Authentication Protocol: SHA
Privacy Protocol: AES128
Group-name: P
You can look for a particular user by using the show SNMP user [username] command.
If we look at the groups we created, I will pick out one, as they are all pretty much the same.
Lab_CSR#show snmp group
groupname: A                                security model:v3 auth
contextname: <no context specified>         storage-type: nonvolatile
readview : v1default                        writeview: <no writeview specified>
notifyview: <no notifyview specified>
row status: active
We notice it has a read view attached by default but no write view. If you wanted to make this user have the ability to have read/write capabilities, then you would need to create a view that has write privileges over the MIBs you want the group to have access to
Now that we have everything defined let’s do some SNMPWALKing!
! Nancy User
Mike@Mikes-MBP:~$ snmpwalk -v3 -u Nancy -l noauthnopriv 192.168.1.250 sysName.0
SNMPv2-MIB::sysName.0 = STRING: Lab_CSR.routedinterface.local
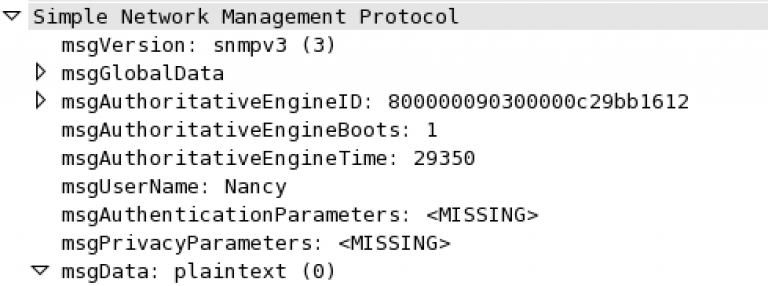
The packet capture snippet above shows that Nancy used the username Nancy but no authentication password. The SNMP GET-Request was sent in cleartext
! Al User
Mike@Mikes-MBP:~$ snmpwalk -v3 -u Al -l authnopriv -a sha -A Auth-Password 192.168.1.250 sysName.0
SNMPv2-MIB::sysName.0 = STRING: Lab_CSR.routedinterface.local
Looking at the packet capture for Al, you see that there is an authentication password, which is encrypted, but the SNMP GET-Request was still sent in clear text
! Peter User
Mike@Mikes-MBP:~$ snmpwalk -v3 -u Peter -l authpriv -a sha -A P@55w0rd! -x aes -X Pr1v@cy! 192.168.1.250 sysName.0
SNMPv2-MIB::sysName.0 = STRING: Lab_CSR.routedinterface.local
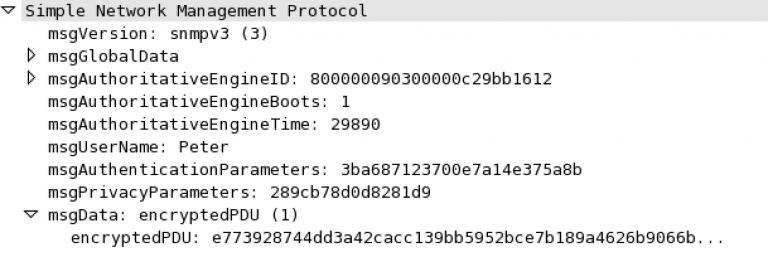
OK, now we are talking; Peter was authenticated, and the SNMP GET-Request was also encrypted.